patientNOW allows you to track inventory on retail items as well as backbar and internally-used products.
Note: This page includes generic Add, Edit, and Disable Functionality
- Add New: opens a new record at the bottom of the window with all of the fields empty. Please carefully review the existing descriptions to see if one of them may work BEFORE adding a description to the system
- Add as New: must be selected to save the information after completing the empty Add New screen. May be selected when an existing record is in focus and you wish to create a copy of that record instead of creating a new, blank record.
- Save Modifications: must be selected when you have made changes to an existing record and you wish to save the changes.
- Disable: select the disable checkbox and select Save Modifications.
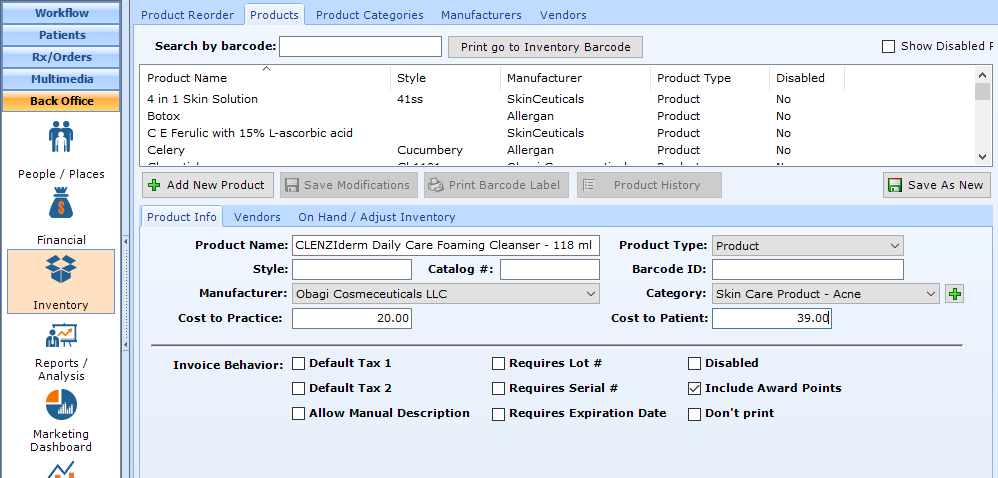
Add a Product
Navigate to Back Office | Inventory, Products tab.
Select Add New Product
- Product Name.
- Try not to duplicate; always check that the Product does not exist in patientNOW before you select Add New Product.
- Don’t use abbreviations or nick names, not every user will understand them.
- Try to use the name of the product from the product box or package.
- If you want certain Products to appear next to each other in reports and pull-down menus, start their names with the same wording (e.g. CLENZIderm in the example below).
- Add the size of the product to the end of the product name (e.g. 118 ml). This allows you to track full size products and travel or trial products separately.
- Product Type. There are 4 options for this.
- Product: this is used for all skin care products, dietary supplements, and other merchandise.
- Implants: allows the product to be visible on the Patients | Clinical Information, Implants tab.
- Tissue Expanders: allows the product to be visible on the Patients | Clinical Information, Tissue Expanders tab.
- Educational Handouts: allows the product to be visible on the Patients | Clinical Information, Educational Handouts tab. Used for manufacturer brochures and booklets that assist in documenting Informed Consent and help you track inventory for those items.
- Catalog. The manufacturers identification number for this product, usually found on a product list or invoice.
- Barcode ID. Should only be used if you are using a barcode reader. To fill in this information, select the white box and then read the barcode on the product with your barcode reader.
- Manufacturer and Category. Select the correct options from the list that you configured previously. For additional information, check out Configuring Inventory.
- Cost to Practice. This is the amount you pay for the product (e.g. wholesale amount). Note: this may change on each invoice. Make sure you update this before receiving inventory if the price has changed.
- Cost to Patient. This is the amount you are charging the patient (e.g. retail amount).
Invoice Behavior. Check the boxes to control the behavior of this product when added to an Invoice.
- Default Tax 1: automatically applies the tax amount defined in Back Office | People / Places, Service Facilities Tab – Service Facility Details window.
- Default Tax 2: automatically applies the tax amount defined in Back Office | People / Places, Service Facilities Tab – Service Facility Details window.
- Allow Manual Description: allows the user to change the name of the product on the Invoice. Warning: if the user changes the name of the product on the invoice, the product will appear separately on all financial reports. Therefore, this is only recommended in a very few instances.
- Requires Lot #: forces the user to enter the lot number for the product used when added to the invoice.
- Requires Serial #: forces the user to enter the serial number for the product used when added to the invoice.
- Requires Expiration Date: forces the user to enter the expiration date for the product used when added to the invoice.
- Disabled: when checked, this product will not appear on Quotes and Invoices in the Add Product dialog
- Include Award Points: accrues award points for the patient as configured in Administration | Financial Admin, Award Points tab. For additional information, check out Configuring Award Points
- Don’t print: when selected, the product will appear on the invoice in patientNOW, but will not print on the invoice given to the patient. These products are specifically used to track cost of goods sold (COGS) for procedures.
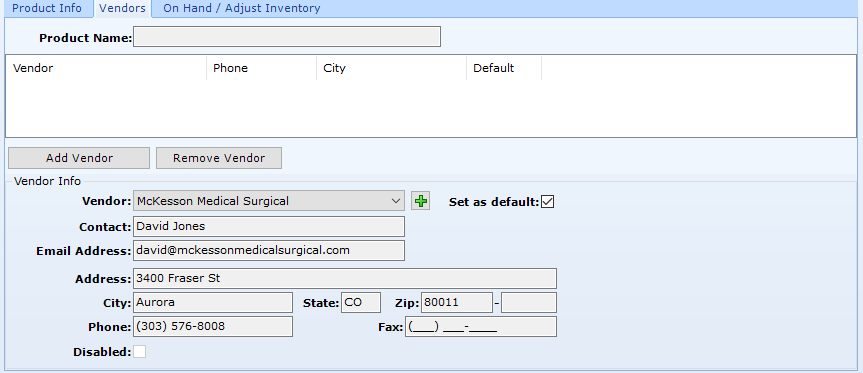
Add Vendor
Select the Vendors tab next to the Product Info tab.
- Select a Vendor entered previously in the Vendors tab in the Vendor pull-down; the information below the Vendor name will fill in automatically.
- Set as Default checkbox. If this is the only vendor, or your default vendor, select this box.
Select Add Vendor.
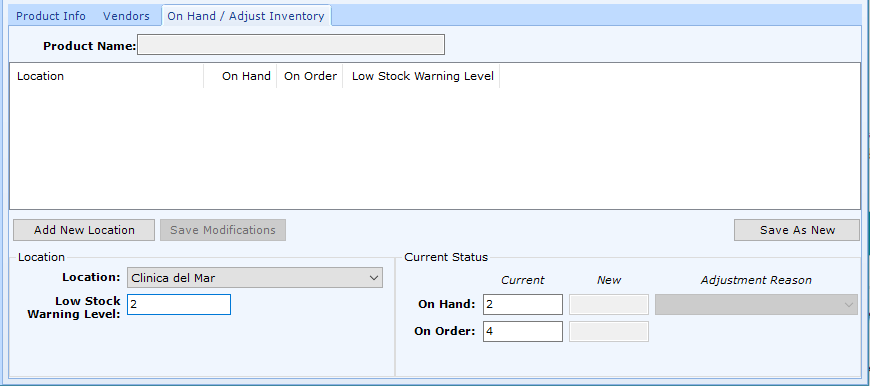
Add Inventory Location
Even if you only have one location for your inventory, you should still complete this portion.
Select the On Hand / Adjust Inventory tab to the right of the Vendors tab.
Select Add New Location.
- Facility. Note: only service facilities with the Inventory is maintained at this location checkbox selected in Back Office | People / Places, Service Facilities tab will appear in the pull-down.
- Low Stock Warning Level.
- On Hand.
- On Order.
Select Save as New