Introduction
Appointment Types allow you to configure how different appointments appear on the schedule, and to set up default duration, appointment resources, and comments. In addition, they play an important part in triggering changes in Treatment Pathways. Warning: patientNOW does not allow you to delete configuration items because they may already be assigned to a patient. However, you may disable them so that they will not appear in patientNOW in order to be selected.
Note: This page includes generic Add, Edit, and Disable Functionality
Appointment Type Settings
- Add New: opens a new record at the bottom of the window with all of the fields empty. Please carefully review the existing descriptions to see if one of them may work BEFORE adding a description to the system
- Add as New: must be selected to save the information after completing the empty Add New screen. May be selected when an existing record is in focus and you wish to create a copy of that record instead of creating a new, blank record.
- Save Modifications: must be selected when you have made changes to an existing record and you wish to save the changes.
- Disable: select the disable checkbox and select Save Modifications.
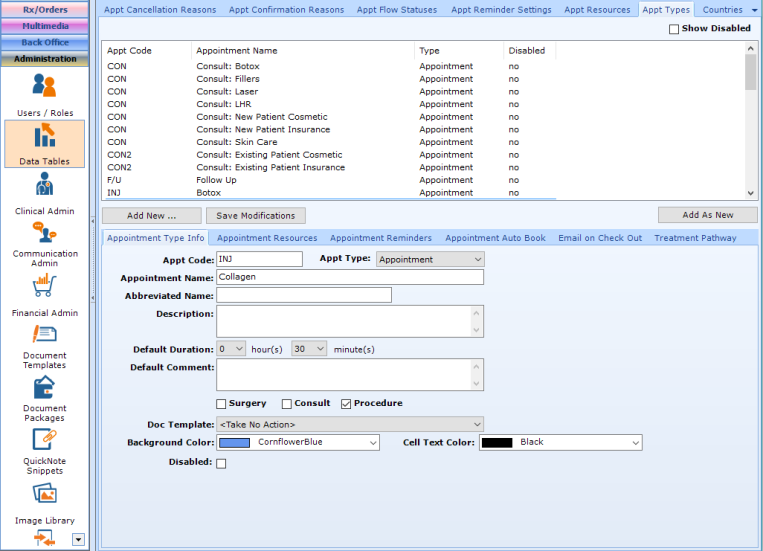
- Appt Code. This should be a 3 to 4-digit code (may be numbers or letters) for the Appointment Type. When selecting an Appointment Type in the Schedule, the list is ordered by this code.
- Appt Type. There are 3 options:
- Appointment. Should be used for all Patient Appointments that are NOT surgery or procedure appointments.
- Procedure. Should be used for all Patient Appointments that ARE surgery OR procedure appointments. The only place in the system that is affected by this selection is the Procedure pull-down on Patients | Patient Communications, Treatment Pathways tab. Only patient appointments that have this selected will appear in that pull-down.
- Office. Should be used for Office Appointments (e.g. Appointment with a product rep, Staff Meeting, etc.)
- Appointment Name. A full name for the appointment (e.g. Collagen Injection with Nurse). The name should be long enough to have some detail, but short enough to appear correctly on reports.
- Abbreviated Name. Not Used
- Description. Not Used
- Default Duration. How long does this appointment normally last? This is a starting point; the user may change the duration at the time the appointment type is selected in the schedule.
- Default Comment. This will automatically fill in the Comment on the Patient Appointment.
- Appointment Category Boxes. These 3 check boxes drive conversion and retention reports, appointment count reports, and surgery deposit reports.
- Consult. If the patient attends this appointment, will an Inquiry convert to a Consult? Is this appointment considered the beginning of the Consult to Surgery conversion?
- Procedure.Used for appointments that are not considered surgeries, so not performed in the operating room, but provide a clinical procedure (e.g. Injectables, Laser Treatments, Aesthetic Treatments)
- Surgery. Used for appointments that are scheduled in the operating room. Normally, these appointments are paid for in advance with surgery deposits.
- Doc Template. When the appointment is checked in, an Encounter Note may be automatically created and assigned to the Provider on the appointment, or the Encounter Note menu can be displayed so that the user can select which document is created and assigned to the Provider.
- Background Color. This will be the color in the background of the appointment when it appears on the schedule in the Workflow | Scheduling section. Note: It is important to take the following colors into account: Appointment Resource, Schedule Block, and Cell Text Color (e.g. don’t make an appointment type the same color as the background color for an appointment resource).
- Cell Text Color. This will be the color of the writing in the appointment when it appears on the schedule (e.g. Patient Name, Appointment Type, etc.).
- Disabled.
Additional Functionality Related to the Appointment Type
In addition to controlling color and reporting, the Appointment Type also triggers additional functionality.
- Appointment Resources subtab.
- If a specific appointment resource (e.g. your Laser room) should be selected every time this appointment type is scheduled, just double-click on an Available Resource on this tab to move it to Assigned Resources. Once this change is saved, every time the user selects this Appointment Type, the same appointment will automatically be placed on the Assigned Resources’ schedule(s).
- This works particularly well for equipment and room resources.
- Appointment Reminders. Navigate to the Appointment Reminders subtab.
- Note: You must configure your Email Settings before this functionality will work. For additional information, check out
- You should put some thought and care into your Appointment Reminders before configuring. For additional information, check out Configuring Appointment Reminders
- Appointment Auto Book subtab
- If you wish to schedule a related appointment at the same time that this Appointment Type is scheduled, Navigate to the Appointment Auto Book tab and double-click on the 2nd Appointment Type to move it to the Assigned Appointment Types on the right.
- A good use of this is Numbing and Injection. The user could select the Numbing Appointment Type on the Medical Assistant’s schedule and when they select OK, a second Add Appointment window automatically appears with the Assigned Appointment Type (Injection) and the user can put this on the Nurse Injectors schedule 15 minutes after the Numbing Appointment. This is a nice feature that saves the scheduler time and reduces error.
- Email on Check Out subtab
- Note: You must configure your Email Settings before this functionality will work. For additional information, check out
- This allows you to send a standard email (e.g. a request for a review or a link to a satisfaction survey) every time a patient checks out. You may select the Document Template (from the list of email templates in Administration | Document Templates, Email Templates tab, define the Subject Line and then specify the number of days or weeks after the appointment to send the email.
- Treatment Pathway
- The Appointment Type is an important trigger for many possible reasons. For additional information, check out Configuring Treatment Pathway Triggers on Appointment Types