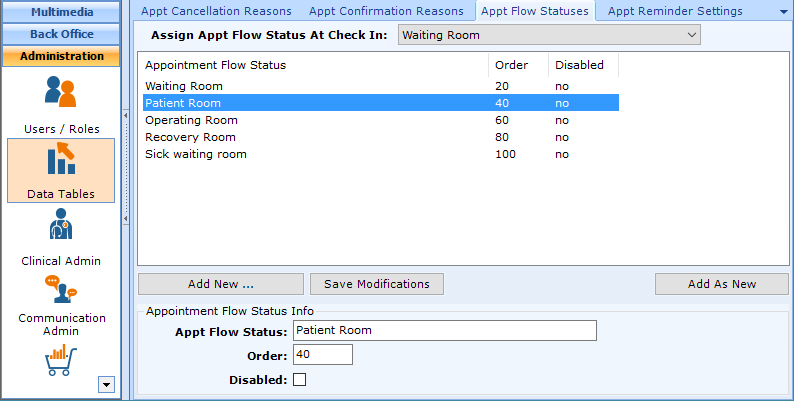
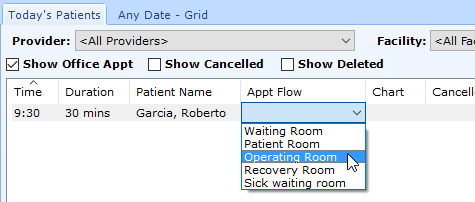
Appointment Flow status is actually not displayed or selected in the Workflow | Scheduling Section; instead they are used to show where in the office the patient is at any given time on the Workflow | Daily Workflow, Today’s Patients tab.
Note: As of version 7.0.182, there is not tracking available for the change in Appointment Flow Status (e.g. how long the patient was in the waiting room). If this is something you would be interested in, please submit an Enhancement Request through our support team.
Note: This page includes generic Add, Edit, and Disable Functionality
- Add New: opens a new record at the bottom of the window with all of the fields empty. Please carefully review the existing descriptions to see if one of them may work BEFORE adding a description to the system
- Add as New: must be selected to save the information after completing the empty Add New screen. May be selected when an existing record is in focus and you wish to create a copy of that record instead of creating a new, blank record.
- Save Modifications: must be selected when you have made changes to an existing record and you wish to save the changes.
- Disable: select the disable checkbox and select Save Modifications.
Add Appointment Flow Status
Navigate to Administration | Data Tables, Appt Flow Statuses tab.
Select Add New
- Appt Flow Status.Warning: Review the existing options before adding to make sure that you don’t create a duplicate entry.
- Order. You may review the order set for other reasons above.
- Disabled. If you wish to no longer have the option to select this reason when canceling an appointment.
Select Save as New
Default System Values
At the top of the tab, you may select default values.
- Assign Appt Flow Status at Check In. This is normally set to Waiting Room because the physical location of the patient when the appointment is checked in to patientNOW is generally the waiting room.