patientNOW offers bulk scanning using the BarcodeNOW license. In order to use this module, you will need to have the 3 of 9 Barcode font installed and the workstation configured to use the BarcodeNOW license.
For assistance configuring BarcodeNOW, contact the patientNOW support team at (800) 436-3150 ext. 2 or support@patientnow.com
Two Options for Scanning
There are 2 ways to use the BarcodeNOW functionality.
- Print separator sheets and scan in one or more charts
- Adding Barcodes to printed documents from patientNOW to automatically scan them in.For additional information, check out Adding Barcodes to Document Templates
Print Separator Sheets for an Individual Patient
Navigate to Patients | Patient Communications, Communications Hub tab.
In the Appointments section, select Print Barcode Separator Sheets.
Print Separator Sheets for all Patients with an Appointment on Given Day(s)
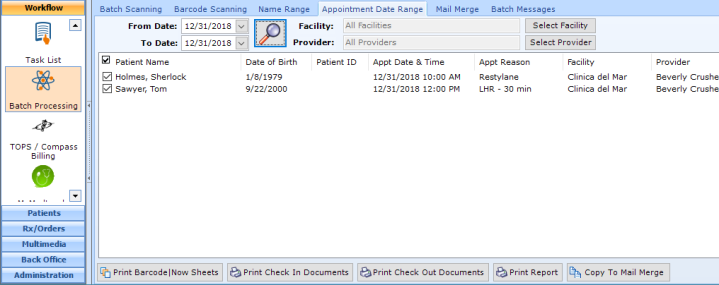
Navigate to Workflow | Batch Processing, Appointment Date Range tab.
Select the Appointment Date.
Select the Facility.
Select the Provider.
Select Search (Magnifying Glass).
Check the boxes next to the patients for whom you wish to print separator sheets.
Select Print Barcode|NOW Sheets.

Print Separator Sheets for all Patients with Last Name in a Given Range
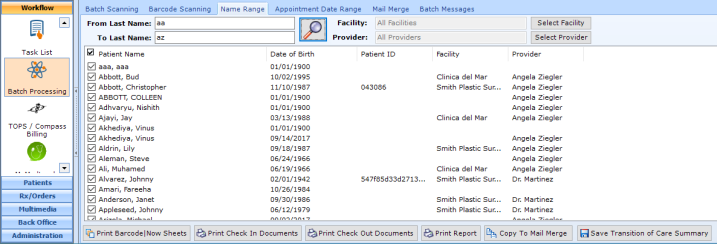
Navigate to Workflow | Batch Processing, Name Range tab.
Enter the From Last Name.
Enter the To Last Name.
Select the Facility.
Select the Provider.
Select Search (Magnifying Glass).
Check the boxes next to the patients for whom you wish to print separator sheets.
Select Print Barcode|NOW Sheets.

Print Barcode Separator Sheets
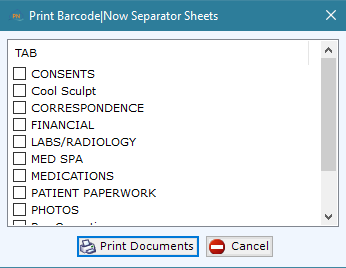
In all 3 situations, a dialog will appear with all of the chart tabs in your patientNOW system. Select the separator sheets you need to print and select Print Documents. Perhaps you just want to scan New Patient Paperwork. Just select that tab so that you will not waste paper.

patientNOW will print a Patient New Folder Sheet on one page and then separator pages for each section.
Scan in Full Chart(s)
Navigate to Workflow| Batch Processing, Batch Scanning tab.
For each chart you are scanning, arrange the patient’s paper chart into sections with the tab separator sheet on top of the documents for that tab and the New Folder page on the very top.
Place the New Folder page into the scanner first and then the paper chart and separator sheets; you may scan one patient at a time or multiple (as long as the New Folder page separates each chart.)
As patientNOW scans the chart(s), you will be prompted at each separator sheet to see if you need to make any date, name, etc. changes for that tab. Make any changes and select OK to continue.
