A schedule block for an appointment resource is a period of time that is restricted to specific appointment types (e.g. consults or post-ops). So, if your office blocks every Wednesday for Consult appointments from 8:30 AM to 12:30 PM, that should be configured as a Schedule Block.
To accommodate schedule resources with different schedule blocks for each day, you may configure each resource separately. An example of this is a consult-only period, where the resource wishes to see only Consult appointments during a specific timeframe (e.g. Monday mornings).
Warning: If you are using myAppointmentNOW (online scheduling), patients may schedule in any open area of a default schedule. If you wish to close a period to online scheduling, you will need to create a schedule block.
Add or Edit Schedule Block
Note: you must configure Appointment Resources, and Default Schedules before you should add Schedule Blocks.For additional information, check out Configuring Schedule (Appointment) Resources or Configuring Default Schedules
Navigate to Administration | Data Tables, Schedule Configuration tab.
Select a Date on which to start; the system defaults to Today.
Select a Time Slot Interval. It may be easier to look at a larger interval (e.g. 30 min) than you normally view on the schedule.
Select a resource from the pull-down. If you wish to look at multiple resources, you may Select the Select Resources button.
Right-click on the day and time you wish to start.
Select Add Schedule Block.
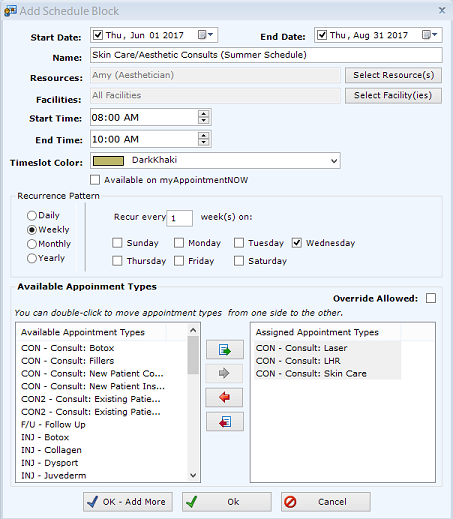 Start Date and End Date. The date this schedule block starts. For instance, if you are changing your schedule for summer to do Skin Care Consults from 8:00 AM to 10:00 AM from June 1 through August 31, your start date would be June 1 and your End Date would be August 31.
- Name. Enter a descriptive name. Users will see this when they hover over the block on the schedule.
- Resources. You may select one resource or multiple resources to whom you will apply this schedule block.
- Facilities. You may select one service facility or multiple that will have this schedule block.
- Start Time and End Time. If you only wish Consult appointments to be scheduled between 8:00 AM to 10:00 AM, 8:00 AM is the start time and 10:00 AM is the end time.
- Timeslot Color. This is the background color for the Schedule Block. Note: This color will replace the Default Schedule color; you may not want the Schedule Block Timeslot Color to be the same as the Default Schedule.
- Available on myAppointmentNOW. If you wish to allow your patients to schedule from our Online Scheduling module, check this box. If you wish ONLY your staff to schedule appointments during this time period, do NOT check this box.
- Recurrence Pattern. This is where you tell patientNOW that you want the exact same schedule block applied to days, weeks, months, or years in a recurring manner. For additional information, check out Recurrence Patterns.
- Available Appointment Types. The window on the left shows all of your configured Appointment Types (that are not disabled). You may select the appointment types you wish to allow during this schedule block on the left and move them to the right by double-clicking, or left-clicking and Selecting the green arrow button.
- Override Allowed. Check this box when you wish to allow users to override the Assigned Appointment Types and schedule any appointment during this time frame. If you wish to absolutely prevent your staff from scheduling any other appointment type, then check this box. If your staff is experienced and will respect the Assigned Appointment Types unless it is an emergency, then do not check this box.